免费 ssl 证书申请
首先,前往 https://freessl.cn/acme/auth。
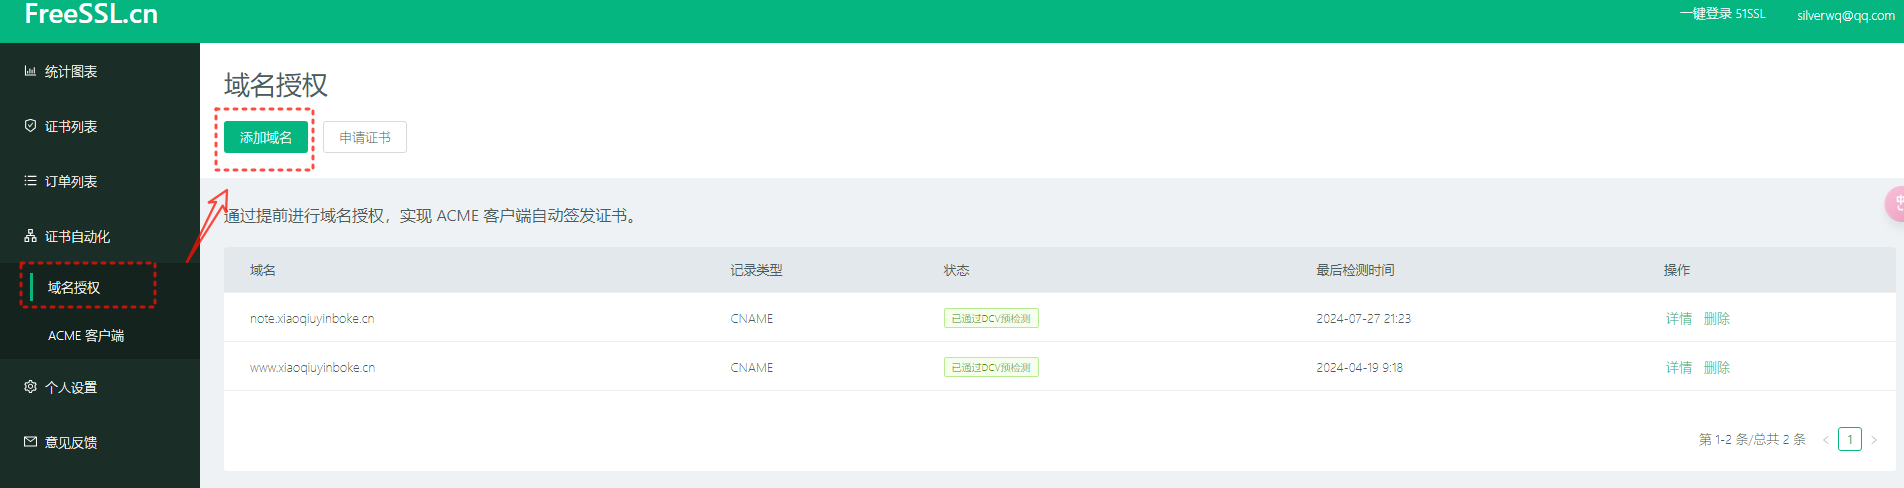
这个需要注册登录。
然后,添加域名,这个需要解析校验,添加域名的时候,会提示。
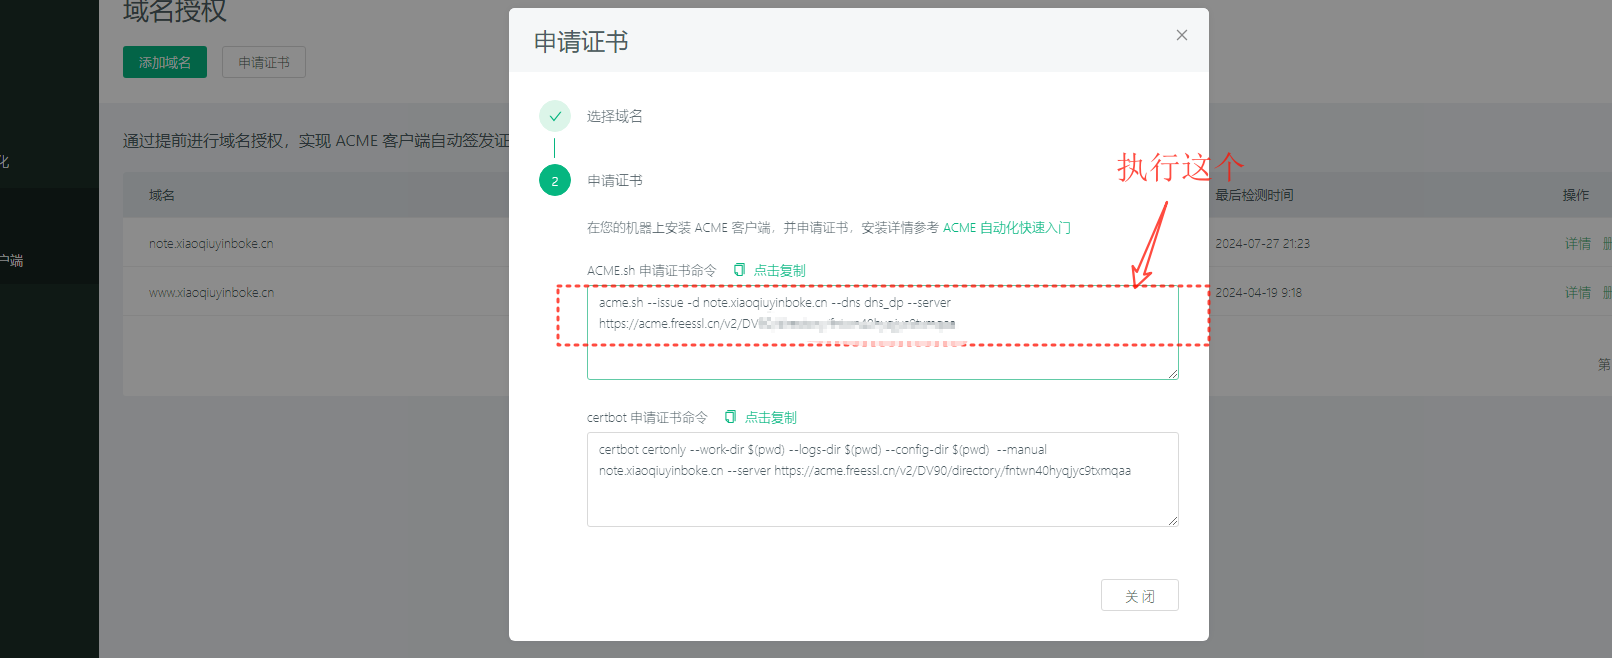
然后安装 acme 客户端(https://docs.certcloud.cn/docs/edupki/acme/)。
这个因为会访问gitbub,如果失败的话,可以重试几次。
# 最好以root身份执行
curl https://get.acme.sh | sh -s email=my@example.com
安装完成后,会自动添加定时任务

然后重新连接ssh,这样子acme命令就可以生效了,使用acme命令下载ssl证书。
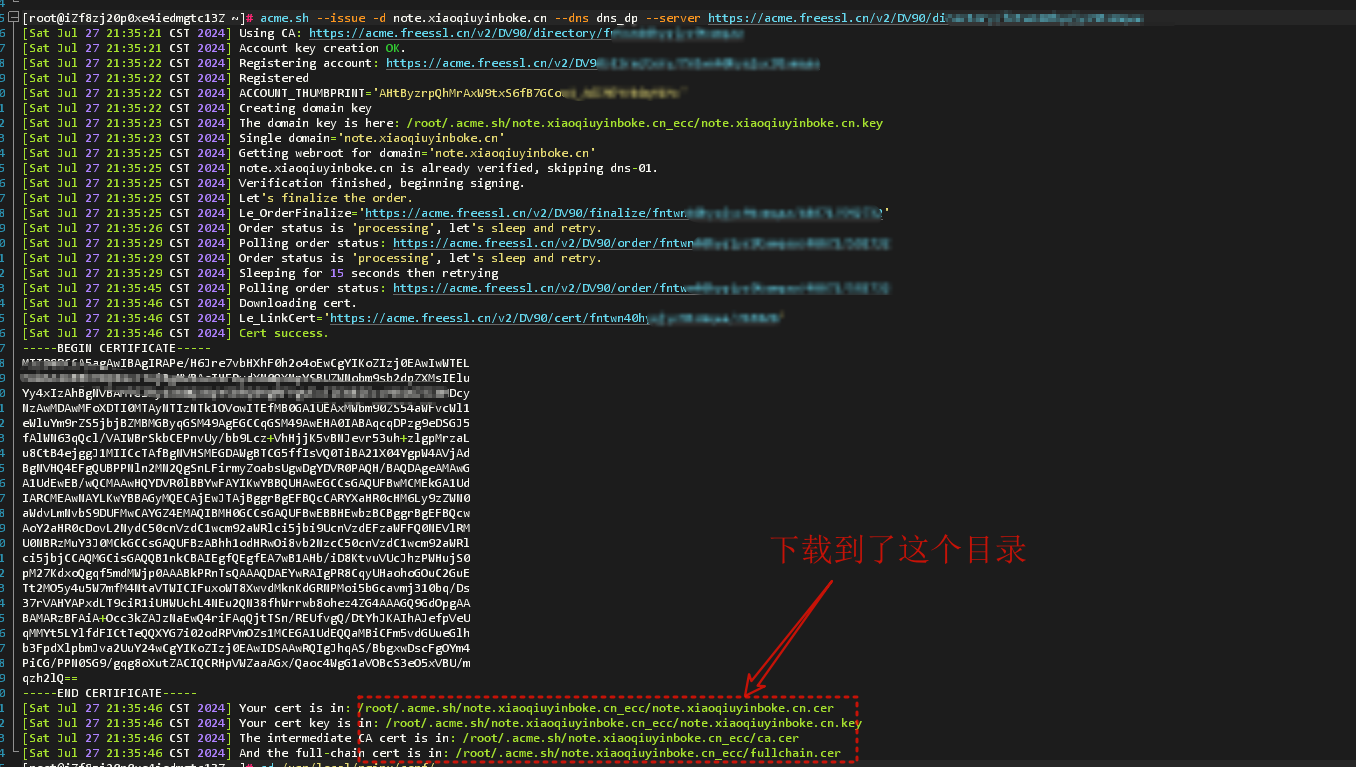
如果是过期后,再重新生成证书的话,从这一步开始,因为是访问外网,有可能会失败,多执行几次就好。
执行完成后,正常证书是下载到
然后安装到执行这个命令,复制证书到nginx目录即可
acme.sh --install-cert -d www.xiaoqiuyinboke.cn \
--key-file       /usr/local/nginx/conf/ssl/www_xiaoqiuyinboke_cn_key.pem  \
--fullchain-file /usr/local/nginx/conf/ssl/www_xiaoqiuyinboke_cn_cert.pem \
--reloadcmd     "/usr/local/nginx/sbin/nginx -s reload"
配置 nginx
server {
    # 监听的端口,nginx 1.15.0及以上版本,使用listen 443 ssl代替,1.15.0以下的使用listen 443
    listen       443 ssl;
    server_name  www.xiaoqiuyinboke.cn;
    #charset koi8-r;

    # ssl证书地址
    # 指定pem文件所在路径,如果写相对路径,必须把该文件和nginx.conf文件放到一个目录下。
    ssl_certificate    ssl/cert.pem;
    # 指定私钥文件key所在路径,如果写相对路径,必须把该文件和nginx.conf文件放到一个目录下。
    ssl_certificate_key  ssl/key.pem;
    # ssl验证相关配置
    # 缓存有效期
    ssl_session_timeout  5m;
    # 加密算法
    ssl_ciphers ECDHE-RSA-AES128-GCM-SHA256:ECDHE:ECDH:AES:HIGH:!NULL:!aNULL:!MD5:!ADH:!RC4;
    # 安全链接可选的加密协议
    ssl_protocols TLSv1 TLSv1.1 TLSv1.2;
    # 使用服务器端的首选算法
    ssl_prefer_server_ciphers on;

    #access_log  logs/host.access.log  main;
    root /usr/local/wqy/www/typecho/;

    location / {
    add_header Access-Control-Allow-Origin *;
   try_files $uri $uri/ /index.php?$query_string;
        index  index.html index.htm index.php;
        autoindex on;
    }

    #error_page  404              /404.html;

    # redirect server error pages to the static page /50x.html
    #
    error_page   500 502 503 504  /50x.html;
    location = /50x.html {
        root   html;
    }

    # proxy the PHP scripts to Apache listening on 127.0.0.1:80
    #
    #location ~ \.php$ {
    #    proxy_pass   http://127.0.0.1;
    #}

    # pass the PHP scripts to FastCGI server listening on 127.0.0.1:9000
    #
    location ~ .+\.php($|/) {
   add_header Access-Control-Allow-Origin *;
        fastcgi_pass   127.0.0.1:9000;
        fastcgi_index  index.php;
        fastcgi_split_path_info  ^(.+\.php)(/.*)$;
        fastcgi_param  PATH_INFO $fastcgi_path_info;
        include        fastcgi.conf;
        #fastcgi_param  SCRIPT_FILENAME  $document_root$fastcgi_script_name;
        #include        fastcgi_params;
    }

    # deny access to .htaccess files, if Apache's document root
    # concurs with nginx's one
    #
    #location ~ /\.ht {
    #    deny  all;
    #}

    # include ./conf/vhost/*.conf;
}
# 配置80端口重定向443端口
server {
    listen 80;
    server_name  www.xiaoqiuyinboke.cn;
    rewrite ^(.*)$ https://${server_name}$1 permanent;
}
反向代理配置
# This part is for proxy and HTTPS configure
server {
    listen 443;
    server_name note.xiaoqiuyinboke.cn;
    ssl_certificate ssl/www_xiaoqiuyinboke_cn_cert.pem;
    ssl_certificate_key ssl/www_xiaoqiuyinboke_cn_key.pem;
    # ssl验证相关配置
    # 缓存有效期
    ssl_session_timeout  5m;
    # 加密算法
    ssl_ciphers ECDHE-RSA-AES128-GCM-SHA256:ECDHE:ECDH:AES:HIGH:!NULL:!aNULL:!MD5:!ADH:!RC4;
    # 安全链接可选的加密协议
    ssl_protocols TLSv1 TLSv1.1 TLSv1.2;
    # 使用服务器端的首选算法
    ssl_prefer_server_ciphers on;

    location / {
        proxy_set_header Host $host;
        proxy_set_header X-Real-IP $remote_addr;
        proxy_set_header X-Forwarded-For $proxy_add_x_forwarded_for;
        proxy_set_header X-Forwarded-Proto $scheme;
        proxy_set_header Upgrade $http_upgrade;
        proxy_set_header Connection "upgrade";
        proxy_pass http://127.0.0.1:8080; # change it to a different port if non-default is used
        proxy_read_timeout 90;
        proxy_redirect http://127.0.0.1:8080 note.xiaoqiuyinboke.cn; # change them based on your IP, port and domain
    }
}

# This part is for HTTPS forced
server {
    listen 80;
    server_name note.xiaoqiuyinboke.cn;
    return 301 https://$server_name$request_uri;
}