搜索到
335
篇与
的结果
-
 MySQL常见错误码:如何解决MySQL数据库错误 1005:创建表失败 1006:创建数据库失败 1007:数据库已存在,创建数据库失败<=================可以忽略 1008:数据库不存在,删除数据库失败<=================可以忽略 1009:不能删除数据库文件导致删除数据库失败 1010:不能删除数据目录导致删除数据库失败 1011:删除数据库文件失败 1012:不能读取系统表中的记录 1020:记录已被其他用户修改 1021:硬盘剩余空间不足,请加大硬盘可用空间 1022:关键字重复,更改记录失败 1023:关闭时发生错误 1024:读文件错误 1025:更改名字时发生错误 1026:写文件错误 1032:记录不存在<=============================可以忽略 1036:数据表是只读的,不能对它进行修改 1037:系统内存不足,请重启数据库或重启服务器 1038:用于排序的内存不足,请增大排序缓冲区 1040:已到达数据库的最大连接数,请加大数据库可用连接数 1041:系统内存不足 1042:无效的主机名 1043:无效连接 1044:当前用户没有访问数据库的权限 1045:不能连接数据库,用户名或密码错误 1048:字段不能为空 1049:数据库不存在 <=============================可以忽略 1050:数据表已存在 1051:数据表不存在 1054:字段不存在 1062:字段值重复,入库失败<==========================可以忽略 1065:无效的SQL语句,SQL语句为空 1081:不能建立Socket连接 1114:数据表已满,不能容纳任何记录 1116:打开的数据表太多 1129:数据库出现异常,请重启数据库 1130:连接数据库失败,没有连接数据库的权限 1133:数据库用户不存在 1141:当前用户无权访问数据库 1142:当前用户无权访问数据表 1143:当前用户无权访问数据表中的字段 1146:数据表不存在 <=============================可以忽略 1147:未定义用户对数据表的访问权限 1149:SQL语句语法错误 1158:网络错误,出现读错误,请检查网络连接状况 1159:网络错误,读超时,请检查网络连接状况 1160:网络错误,出现写错误,请检查网络连接状况 1161:网络错误,写超时,请检查网络连接状况 1169:字段值重复,更新记录失败 1177:打开数据表失败 1180:提交事务失败 1181:回滚事务失败 1203:当前用户和数据库建立的连接已到达数据库的最大连接数,请增大可用的数据库连接数或重启数据库 1205:加锁超时 1211:当前用户没有创建用户的权限 1216:外键约束检查失败,更新子表记录失败 1217:外键约束检查失败,删除或修改主表记录失败 1226:当前用户使用的资源已超过所允许的资源,请重启数据库或重启服务器 1227:权限不足,您无权进行此操作 1235:MySQL版本过低,不具有本功能
 -
CentOS安装Supervisor: 详细步骤和教程 安装supervisor 使用yum命令安装(推荐) $ sudo su - #切换为root用户 yum install epel-release yum install -y supervisor systemctl enable supervisord #开机自启动 systemctl start supervisord # 启动supervisord服务 systemctl status supervisord # 查看supervisord服务状态 ps -ef | grep supervisord # 查看是否存在supervisord进程 配置开机启动 vim /lib/systemd/system/supervisord.service [Unit] Description=Process Monitoring and Control Daemon After=rc-local.service nss-user-lookup.target [Service] Type=forking ExecStart=/usr/bin/supervisord -c /etc/supervisord.conf ExecStop=/usr/bin/supervisorctl $OPTIONS shutdown ExecReload=/usr/bin/supervisorctl $OPTIONS reload KillMode=process Restart=on-failure RestartSec=40s [Install] WantedBy=multi-user.target supervisor配置 vim /etc/supervisord.d/yii-queue-worker.ini [program:yii-queue-worker] process_name=%(program_name)s_%(process_num)02d command=/usr/local/webservice/php73/bin/php /www/xxx/yii queue/listen --verbose=1 --color=0 autostart=true autorestart=true user=www numprocs=4 redirect_stderr=true stdout_logfile=/www/log/supervisor/yii-queue-worker.log 命令 更新新的配置到supervisord supervisorctl update supervisorctl status:查看所有进程的状态 重新启动配置中的所有程序 supervisorctl reload 查看正在守候的进程 supervisorctl 停止某一进程 (program\_name=你配置中写的程序名称) supervisorctl stop program\_name 重启某一进程 (program\_name=你配置中写的程序名称) supervisorctl restart program\_name 停止全部进程 supervisorctl stop all
-
-
解决安装php的zip扩展时遇到的问题 | 技术支持 当前环境 CentOS Linux release 7.6.1810 (Core) php 8.1.16 问题 前段时间在个人的服务器上想升级一下php版本,然后就下载编译安装了7.4.3版本。编译时遇到几个No package 'xxx' found,比如No package 'sqlite3' found,只需要网上搜一下安装对应的库就行了,比如对应sqlite3的,执行yum install sqlite-devel就可以了。这里不多赘述,网上搜一下就行了。 但是有个libzip提示版本太低,yum自带的是0.10,网上各种升级安装,源码编译安装都不好用,还是会有相同的提示。 checking whether to enable zend-test extension... no checking for zip archive read/write support... yes checking for libzip >= 0.11... no configure: error: Package requirements (libzip >= 0.11) were not met: Requested 'libzip >= 0.11' but version of libzip is 0.10.1 Consider adjusting the PKG_CONFIG_PATH environment variable if you installed software in a non-standard prefix. Alternatively, you may set the environment variables LIBZIP_CFLAGS and LIBZIP_LIBS to avoid the need to call pkg-config. See the pkg-config man page for more details. 解决 姿势一(方便) 这个方法经过验证,无效,所以还是用姿势二吧 rpm -Uvh http://rpms.remirepo.net/enterprise/remi-release-7.rpm yum —enablerepo=remi install libzip5-devel 姿势二(知道咋回事) 编译安装,指定PKG_CONFIG_PATH,上面报错中其实有提示信息,让我们考虑调整PKG_CONFIG_PATH环境变量。 下面是详细步骤: # 先卸载已有 yum remove libzip # 然后安装 wget https://libzip.org/download/libzip-1.2.0.tar.gz tar -zxvf libzip-1.2.0.tar.gz cd libzip-1.2.0 ./configure make && make install 装完了之后找一下/usr/local/lib下有没有pkgconfig目录,有的话执行命令export PKG_CONFIG_PATH="/usr/local/lib/pkgconfig/"指定PKG_CONFIG_PATH。 到这里问题解决!
-
Centos7-Linux环境下安装Git2.3高版本超详细图文教程 Git介绍 Git — The stupid content tracker, 傻瓜内容跟踪器。Linus Torvalds 是这样给我们介绍 Git 的。 Git 是用于 Linux内核开发的版本控制工具。与常用的版本控制工具 CVS, Subversion 等不同,它采用了分布式版本库的方式,不必服务器端软件支持(wingeddevil注:这得分是用什么样的服务端,使用http协议或者git协议等不太一样。并且在push和pull的时候和服务器端还是有交互的。),使源代码的发布和交流极其方便。 Git 的速度很快,这对于诸如 Linux kernel 这样的大项目来说自然很重要。 Git 最为出色的是它的合并跟踪(merge tracing)能力。 安装Git前期准备 使用以下命令检查服务器是否已经安装了Git #查看是否安装git,如果出现下面的则说明已经安装过了git,需要卸载 git --version #卸载git命令 yum remove git 若出现以上版本号,则代表已经安装了git,不需要再次安装了,否则就安装,其实安装的话,分为用yum安装和下载git源码编译安装。但是cetos5以及以下版本中的yum都没有git,无法使用yum安装,而cetos6可以使用yum安装git,但是安装的git是1.7.1版本的,而github需要的git版本最低都不能低于1.7.2。所以如果是cetos7以及以上版本的,推荐使用yum安装,方便,如果是cetos7以下的,请使用git源码编译安装git。下面展示这两种安装步骤: 编译安装Git 使用yum命令安装 #yum源中安装的git版本是1.7.1,Github等需要的Git版本最低都不能低于1.7.2 yum -y install git #查看git的版本号 git --version #因为版本要求,我们一般不用上面的方法,而是下载git源码编译安装 通过编译源码安装Git (支持高版本Git的安装) 安装编译 Git 所需要的依赖: yum install curl-devel expat-devel gettext-devel openssl-devel zlib-devel gcc perl-ExtUtils-MakeMaker 安装编译源码所需依赖的时候,yum 自动安装了 Git,需要先卸载这个旧版的 Git: yum -y remove git 下载Git,选择你需要的版本下载即可 1.手动下载地址:https://mirrors.edge.kernel.org/pub/software/scm/git/ 2.通过wget命令下载 #进入src目录,或者你想下载到那个目录 cd /usr/local/src #执行下载命令 wget https://mirrors.edge.kernel.org/pub/software/scm/git/git-2.31.1.tar.gz --no-check-certificate 3.官网下载:https://git-scm.com/downloads 下载完成后通过Xshell等工具将压缩包上传到服务器指定目录,我是上传到 /usr/local/src下的 解压到 /usr/local/src 目录下 tar -zxvf git-2.31.1.tar.gz -C /usr/local/src/ 编译安装 #进入解压后的目录 cd /usr/local/src/git-2.31.1/ #执行编译安装 ./configure --prefix=/usr/local/git make make install 设置环境变量 echo "export PATH=$PATH:/usr/local/git/bin" >> /etc/profile source /etc/profile 验证版本后是否正常 [root@honghua-centos-02 ~]# git --version git version 2.31.1 若上述步骤初夏如下显示,则表示当前git为系统自动带git [root@iZbp1flzt6x7pxmxfhmxeeZ git-2.31.1]# git --version git version 1.8.3.1 卸载系统自带的git(前面如果执行了,这里不用在执行了) #卸载系统自带git yum remove git -y #重新执行如下命令更新环境变量 source /etc/profile #再次查看版本,如下表示OK [root@honghua-centos-02 ~]# git --version git version 2.31.1 总结 至此在Centos7-Linux下安装Git 2.3.1已经全部完成,如果按照上述步骤没有成功,那我建议你卸载Git再去看看别人写的步骤把
-
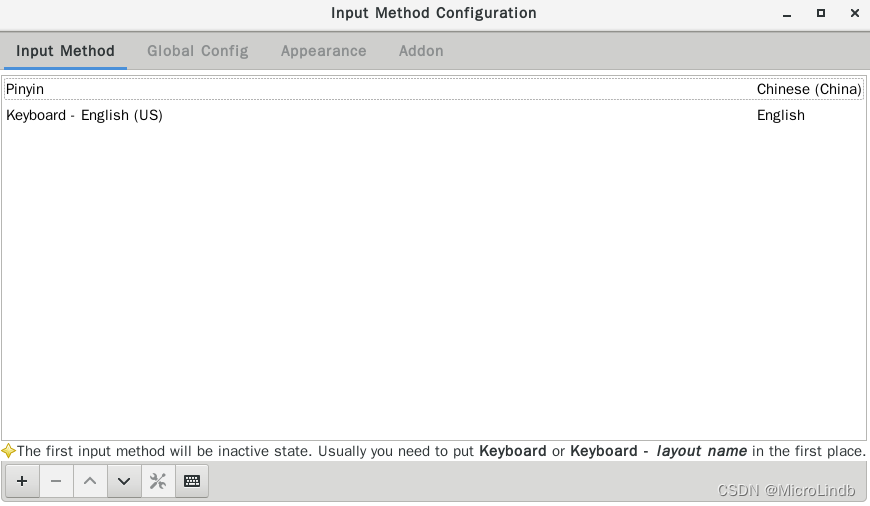
CentOS 7.9安装搜狗输入法教程 - 详细步骤和方法 总览 1.如何在 centos7.x 中使用 搜狗输入法 安装依赖 切换至 root 用户 su root 更新 yum yum update 卸载 ibus rpm -e --nodeps ibus 安装 epel 源 yum -y install epel-release 安装 fcitx 环境、qtwebkit包 和 alien 转换工具等(可以将 .deb 文件转为 .rpm 文件) yum install -y qtwebkit yum install -y fcitx* yum install -y alien yum install -y redhat-lsb # fcitx-configtools 要依赖此包中的内容 下载 2.2.0版本 的 linux 搜狗输入法 cd 至 downloads 目录,或者其他的目录,将这个 .deb 文件下载至此目录 wget http://cdn2.ime.sogou.com/dl/index/1524572264/sogoupinyin_2.2.0.0108_amd64.deb 使用 alien 强制转换 deb 文件 至 rpm 文件 alien -r --scripts sogoupinyin_2.2.0.0108_amd64.deb 强制安装 转换后的搜狗输入法安装文件 rpm -ivh --force sogoupinyin-2.2.0.0108-2.x86_64.rpm 将搜狗输入法词语库转移至 fcitx cp /usr/lib/x86_64-linux-gnu/fcitx/fcitx-sogoupinyin.so /usr/lib64/fcitx/ 为新目录授权 chown -R 776 /usr/share/fcitx-sogoupinyin/ 检查 QT 依赖及 fcitx-configtool、fcitx-pinyin yum -y install fcitx-qt5 fcitx-configtool yum -y install fcitx-pinyin 修改环境变量 vim /etc/profile 在文件末尾添加内容 export XIM_PROGRAM=fcitx export GTK_IM_MODULE=fcitx export QT_IM_MODULE=fcitx export XMODIFIERS="@im=fcitx" 在非 root 用户下开启 fcitx、fcitx-configtools 重新打开终端,并运行 fcitx -r fcitx-configtool 添加 pinyin 注意!是 pinyin 而不是 SogouPinYin!否则会报错! 如果不能显示出任何输入法,则直接重启,再重复 13. 重新启动 reboot 若无法正常使用 请多次尝试 重复 13~14 步骤,并重新检查依赖项是否已经 OK
-
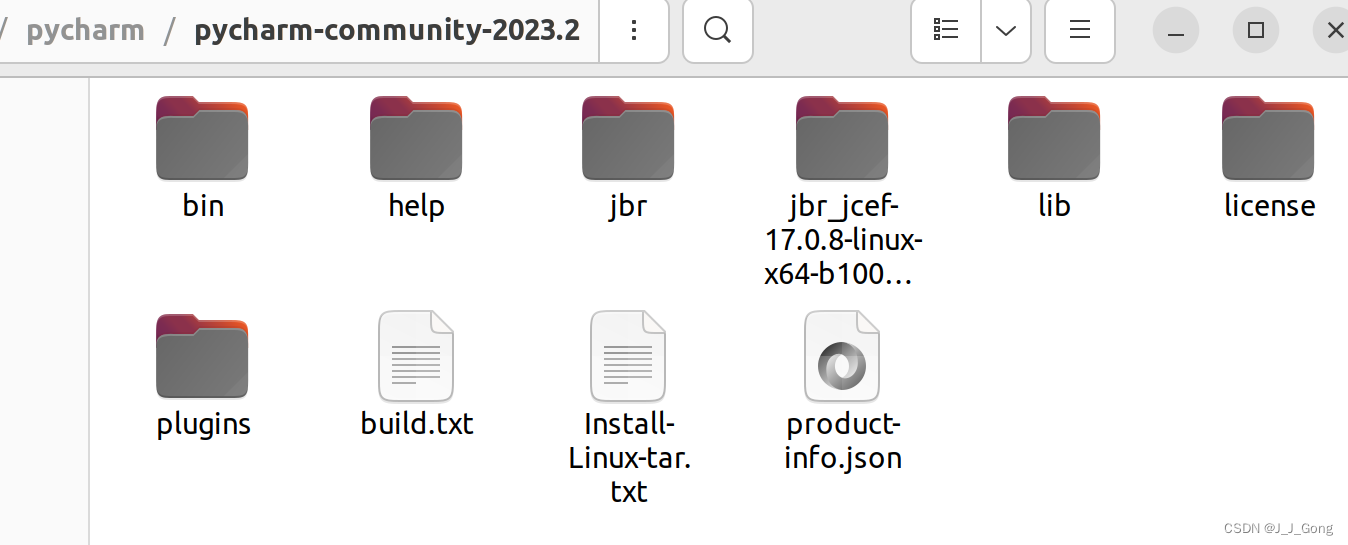
解决 WSL 下 CentOS pycharm 2022.3.X FCITX 输入法不跟随光标问题 概述 在使用pycharm时,输入中文候选框总是在窗口左下角,不能随光标移动,输入时十分不便。网络上已经有一些解决方法,但版本变化后佬们编译好的已经不能立等可取了。 参考链接 很多人在讨论这个问题 解决方法 统一解决方案:更新pycharm 直接更新pycharm到2023.3.2,这个问题已经被官方修复了(PS:整整花了十年修复hhh) 针对不想更新的情况 点击链接下载jbr 解压缩并将其复制到pycharm安装目录下 打开pycharm,使用Ctrl+Shift+A,输入Choose Boot Java Runtime for the IDE 依次点选新建,添加自定义运行时,添加JDK,选择位置,选择解压缩后的文件夹 重启pycharm 针对ibus 没有找到什么有效方法,建议更换输入法(bushi
-
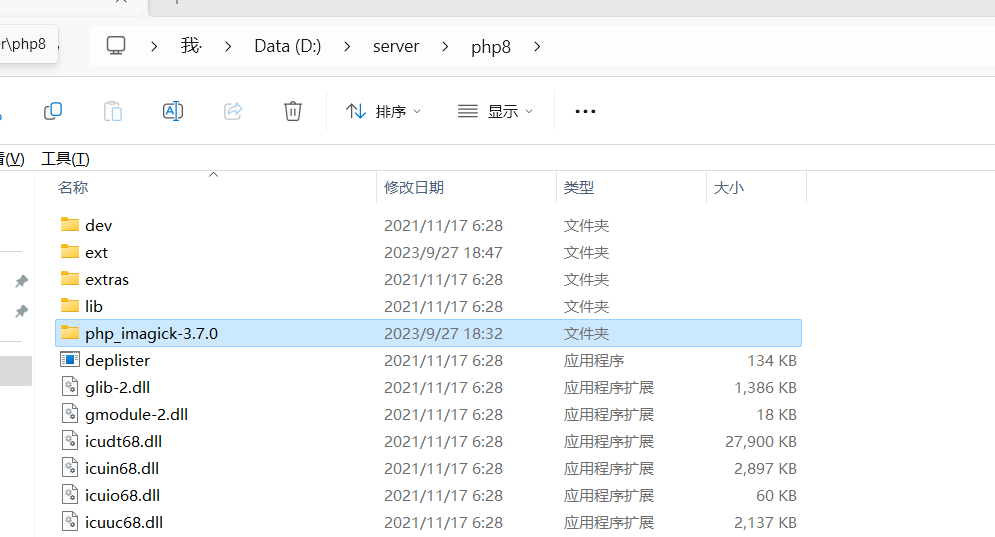
Windows下php安装扩展imagick 3.7.0 概述 ImageMagick 是用来创建,编辑,合并位图图像的一套组件。 它能够用于读取,转换,写入多种不同格式的图像。 包含 DPX、EXR、GIF、JPEG、JPEG-2000、PDF、PhotoCD、PNG、Postscript、SVG 和 TIFF。 window 下安装 下载链接如下: PHP 8.1 8.1 Non Thread Safe (NTS) x64 8.1 Thread Safe (TS) x64 8.1 Non Thread Safe (NTS) x86 8.1 Thread Safe (TS) x86 PHP 8.0 8.0 Non Thread Safe (NTS) x64 8.0 Thread Safe (TS) x64 8.0 Non Thread Safe (NTS) x86 8.0 Thread Safe (TS) x86 PHP 7.4 7.4 Non Thread Safe (NTS) x64 7.4 Thread Safe (TS) x64 7.4 Non Thread Safe (NTS) x86 7.4 Thread Safe (TS) x86 其他版本下载地址: http://pecl.php.net/package/imagick 安装imagick 解压文件夹后,将 php_imagick.dll 复制到php的ext文件夹; 将解压后的其他dll文件复制到php安装目录 改php.ini,加上extension=imagick; 新启动 Apache/NGINX Windows 服务。 或许php安装目录有点凌乱,也可以将上述第二步替换为:**将解压后的文件夹放到php安装目录**,这个方式试了下好像不行,还是按第二步吧 然后将目录添加到系统环境变量: 完了重新启动 Apache/NGINX Windows 服务 安装完成。 要测试扩展是否有效,您可以运行以下 PHP 代码: <?php $image = new Imagick(); $image->newImage(1, 1, new ImagickPixel('#ffffff')); $image->setImageFormat('png'); $pngData = $image->getImagesBlob(); echo strpos($pngData, "\x89PNG\r\n\x1a\n") === 0 ? 'Ok' : 'Failed'; linux 下安装 要安装依赖,其他的还是正常phpize安装 sudo yum install ImageMagick ImageMagick-devel
-
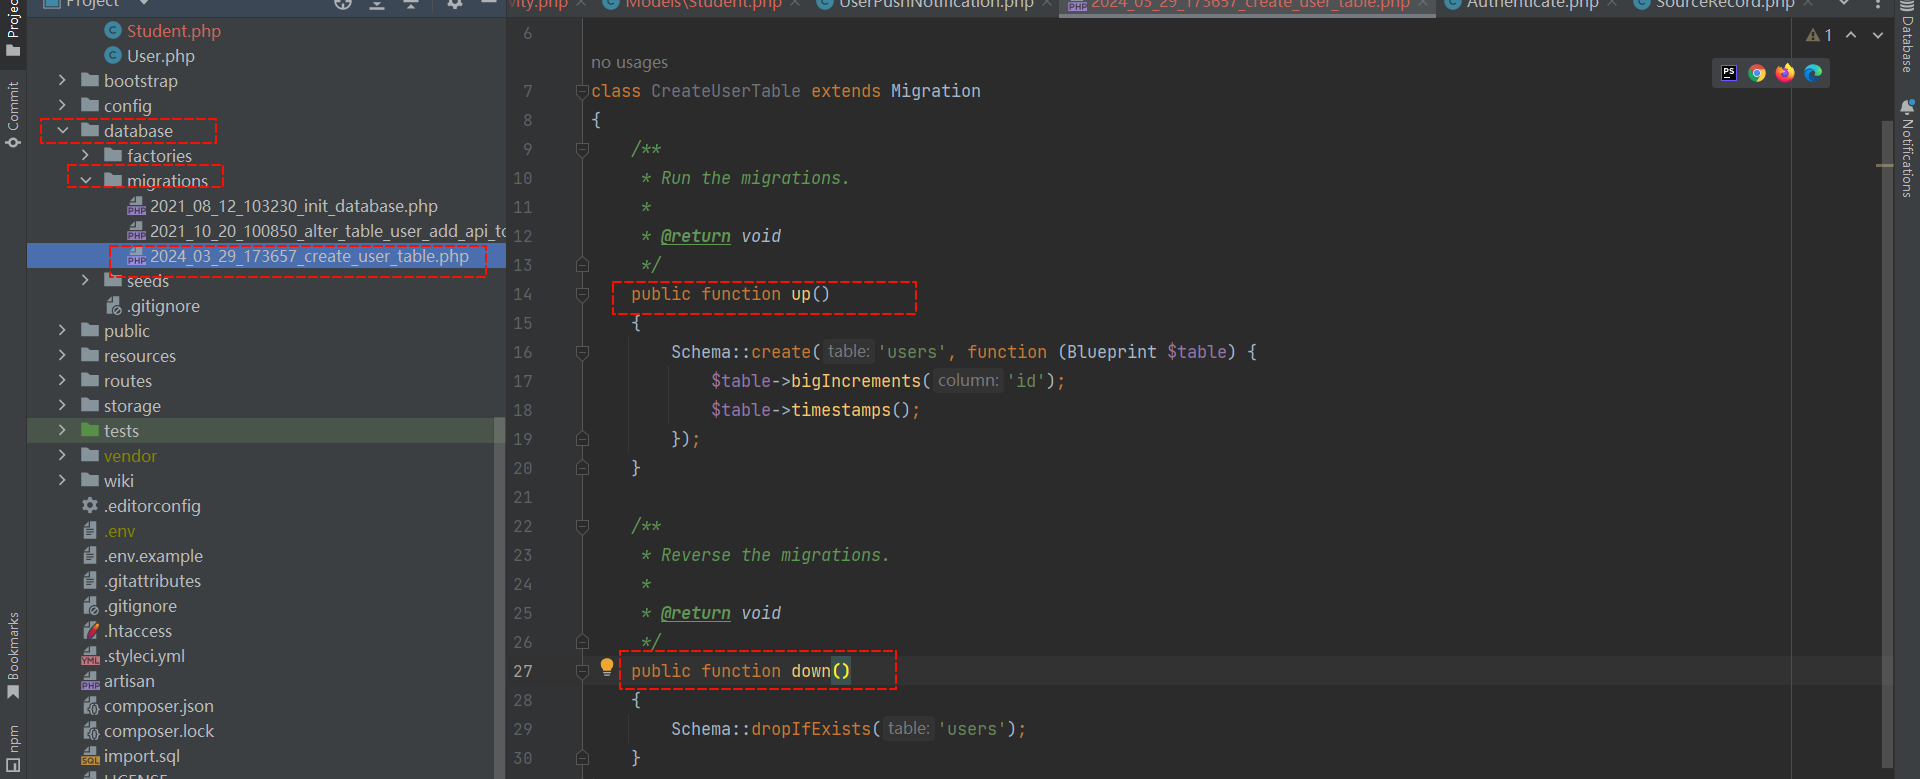
Laravel Artisan 使用: 最佳实践与技巧 系统命令使用 artisan 命令主要是控制台的命令,输入 php artisan 后输出 PS D:\project\php\strongshop> php artisan Laravel Framework 6.20.30 Usage: command [options] [arguments] Options: -h, --help Display this help message -q, --quiet Do not output any message -V, --version Display this application version --ansi Force ANSI output --no-ansi Disable ANSI output -n, --no-interaction Do not ask any interactive question --env[=ENV] The environment the command should run under -v|vv|vvv, --verbose Increase the verbosity of messages: 1 for normal output, 2 for more verbose output and 3 for debug Available commands: clear-compiled Remove the compiled class file down Put the application into maintenance mode env Display the current framework environment help Display help for a command list List commands migrate Run the database migrations optimize Cache the framework bootstrap files preset Swap the front-end scaffolding for the application serve Serve the application on the PHP development server tinker Interact with your application ui Swap the front-end scaffolding for the application up Bring the application out of maintenance mode auth auth:clear-resets Flush expired password reset tokens cache cache:clear Flush the application cache cache:forget Remove an item from the cache cache:table Create a migration for the cache database table config config:cache Create a cache file for faster configuration loading config:clear Remove the configuration cache file db db:seed Seed the database with records db:wipe Drop all tables, views, and types event event:cache Discover and cache the application's events and listeners event:clear Clear all cached events and listeners event:generate Generate the missing events and listeners based on registration event:list List the application's events and listeners key key:generate Set the application key make make:channel Create a new channel class make:command Create a new Artisan command make:controller Create a new controller class make:event Create a new event class make:exception Create a new custom exception class make:factory Create a new model factory make:job Create a new job class make:listener Create a new event listener class make:mail Create a new email class make:middleware Create a new middleware class make:migration Create a new migration file make:model Create a new Eloquent model class make:notification Create a new notification class make:observer Create a new observer class make:policy Create a new policy class make:provider Create a new service provider class make:request Create a new form request class make:resource Create a new resource make:rule Create a new validation rule make:seeder Create a new seeder class make:test Create a new test class migrate migrate:fresh Drop all tables and re-run all migrations migrate:install Create the migration repository migrate:refresh Reset and re-run all migrations migrate:reset Rollback all database migrations migrate:rollback Rollback the last database migration migrate:status Show the status of each migration notifications notifications:table Create a migration for the notifications table optimize optimize:clear Remove the cached bootstrap files package package:discover Rebuild the cached package manifest queue queue:failed List all of the failed queue jobs queue:failed-table Create a migration for the failed queue jobs database table queue:flush Flush all of the failed queue jobs queue:forget Delete a failed queue job queue:listen Listen to a given queue queue:restart Restart queue worker daemons after their current job queue:retry Retry a failed queue job queue:table Create a migration for the queue jobs database table queue:work Start processing jobs on the queue as a daemon route route:cache Create a route cache file for faster route registration route:clear Remove the route cache file route:list List all registered routes schedule schedule:run Run the scheduled commands scout scout:flush Flush all of the model's records from the index scout:import Import the given model into the search index session session:table Create a migration for the session database table storage storage:link Create a symbolic link from "public/storage" to "storage/app/public" telescope telescope:clear Clear all entries from Telescope telescope:install Install all of the Telescope resources telescope:prune Prune stale entries from the Telescope database telescope:publish Publish all of the Telescope resources ui ui:auth Scaffold basic login and registration views and routes vendor vendor:publish Publish any publishable assets from vendor packages view view:cache Compile all of the application's Blade templates view:clear Clear all compiled view files 查看所有命令 php artisan php aratisan list 每个命令都有个帮助 例如 php artisan help migrate 运行迁移 执行未执行过的迁移文件,如果已经执行过不会被执行 php artisan migrate 此命令将执行/database/migrations目录下的所有未执行的迁移文件,主要是执行文件里的up方法。并将记录插入Laravel迁移表中。laravel 里有个 前缀_migrations 的表来判断是否已经执行过了 Make 创建命令 生成控制器 要创建一个控制器,可以使用以下命令: php artisan make:controller UserController 其中UserController是控制器的名称。执行以上命令后,Laravel会在/app/Http/Controllers目录下生成一个UserController.php文件,该文件是一个空的控制器类。 生成模型 要创建一个模型,可以使用以下命令,laravel的model,没有Model后缀: php artisan make:model User 其中User是模型的名称。执行以上命令后,Laravel会在/app目录下生成一个User.php文件,该文件是一个空的模型类。 自动生成注释 php artisan ide-helper:models "App\Models\User" 记住一定要加引号 生成迁移 php artisan make:migration create_user_table --create=users 其中create_users_table是迁移文件的名称,--create=users表示要创建一个名为users的表。执行以上命令后,Laravel会在/database/migrations目录下生成一个迁移文件,该文件包含up()和down()两个方法,可以在其中添加创建和删除表的操作。 生成 seeder php artisan make:seeder UsersTableSeeder 其中UsersTableSeeder是Seeder的名称。执行以上命令后,Laravel会在/database/seeds目录下生成一个UsersTableSeeder.php文件,该文件是一个类,可以在其中添加插入数据的操作 生成命令 要创建新命令,可以使用 make:command Artisan 命令。该命令会在 app/Console/Commands 目录下创建一个新的命令类。如果该目录不存在,也无需担心 - 它会在第一次运行 make:command Artisan 命令的时候自动创建: php artisan make:command SendEmails db 相关的操作 运行Seeder php artisan db:seed 此命令将执行/database/seeds目录下的所有Seeder类,并将记录插入数据库中。试了下好像不行 注册command 类命令:在/app/Console/Commands目录下创建一个新的PHP类 闭包命令:routes/console.php 命令还有一种是单例命令,可以确保没用同时执行的命令。
-
Sonic - 高性能JSON库 介绍 我们在日常开发中,常常会对JSON进行序列化和反序列化。Golang提供了encoding/json包对JSON进行Marshal/Unmarshal操作。但是在大规模数据场景下,该包的性能和开销确实会有点不够看。在生产环境下,JSON 序列化和反序列化会被频繁的使用到。在测试中,CPU使用率接近 10%,其中极端情况下超过 40%。因此,JSON 库的性能是提高机器利用率的关键问题。 Sonic是一款由字节跳动开发的一个全新的高性能、适用广泛的 JSON 库。在设计上借鉴了多款JSON库,同时为了实现对标准库的真正插拔式替换,Sonic使用了 JIT** (即时编译)**。 Sonic的特色 我们可以看出:Sonic是一个主打快的JSON库。 运行时对象绑定,无需代码生成 完备的 JSON 操作 API 快,更快,还要更快! Sonic的设计 针对编解码动态汇编的函数调用开销,使用 JIT 技术在运行时组装与模式对应的字节码(汇编指令),最终将其以 Golang 函数的形式缓存在堆外内存上。 针对大数据和小数据共存的实际场景,使用预处理判断(字符串大小、浮点数精度等)将 SIMD 与标量指令相结合,从而实现对实际情况的最佳适应。 对于 Golang 语言编译优化的不足,使用 C/Clang 编写和编译核心计算函数,并且开发了一套 asm2asm 工具,将经过充分优化的 x86 汇编代码转换为 Plan9 格式,最终加载到 Golang 运行时中。 考虑到解析和跳过解析之间的速度差异很大, 惰性加载机制当然也在 AST 解析器中使用了,但以一种更具适应性和高效性的方式来降低多键查询的开销。 在细节上,Sonic进行了一些进一步的优化: 由于 Golang 中的原生汇编函数不能被内联,发现其成本甚至超过了 C 编译器的优化所带来的改善。所以在 JIT 中重新实现了一组轻量级的函数调用: 全局函数表+静态偏移量,用于调用指令 使用寄存器传递参数 Sync.Map 一开始被用来缓存编解码器,但是对于准静态(读远多于写),元素较少(通常不足几十个)的场景,它的性能并不理想,所以使用开放寻址哈希和 RCU 技术重新实现了一个高性能且并发安全的缓存。 详细设计文档可查阅introduction 安装使用 当前我使用的go version是1.21。 官方建议的版本: Go 1.16~1.21 Linux / MacOS / Windows(需要 Go1.17 以上) Amd64 架构 # 下载sonic依赖 $ go get github.com/bytedance/sonic 基本使用 sonic提供了许多功能。本文仅列举其中较为有特色的功能。感兴趣的同学可以去看一下官方的examples 序列化/反序列化 sonic的使用类似于标准包encoding/json包的使用. func base() { m := map[string]interface{}{ "name": "z3", "age": 20, } // sonic序列化 byt, err := sonic.Marshal(&m) if err != nil { log.Println(err) } fmt.Printf("json: %+v\n", string(byt)) // sonic反序列化 um := make(map[string]interface{}) err = sonic.Unmarshal(byt, &um) if err != nil { log.Println(err) } fmt.Printf("unjson: %+v\n", um) } // print // json: {"name":"z3","age":20} // unjson: map[age:20 name:z3] sonic还支持流式的输入输出 Sonic 支持解码 io.Reader 中输入的 json,或将对象编码为 json 后输出至 io.Writer,以处理多个值并减少内存消耗 func base() { m := map[string]interface{}{ "name": "z3", "age": 20, } // 流式io编解码 // 编码 var encbuf bytes.Buffer enc := sonic.ConfigDefault.NewEncoder(&encbuf) if err := enc.Encode(m); err != nil { log.Fatal(err) } else { fmt.Printf("cutomize encoder: %+v", encbuf.String()) } // 解码 var decbuf bytes.Buffer decbuf.WriteString(encbuf.String()) clear(m) dec := sonic.ConfigDefault.NewDecoder(&decbuf) if err := dec.Decode(&m); err != nil { log.Fatal(err) } else { fmt.Printf("cutomize decoder: %+v\n", m) } } // print // cutomize encoder: {"name":"z3","age":20} // cutomize decoder: map[age:20 name:z3] 配置 在上面的自定义流式编码解码器,细心的朋友可能看到我们创建编码器和解码器的时候,是通过sonic.ConfigDefault.NewEncoder() / sonic.ConfigDefault.NewDecoder()这两个函数进行调用的。那么sonic.ConfigDefault是什么? 我们可以通过查看源码: var ( // ConfigDefault is the default config of APIs, aiming at efficiency and safty. // ConfigDefault api的默认配置,针对效率和安全。 ConfigDefault = Config{}.Froze() // ConfigStd is the standard config of APIs, aiming at being compatible with encoding/json. // ConfigStd是api的标准配置,旨在与encoding/json兼容。 ConfigStd = Config{ EscapeHTML : true, SortMapKeys: true, CompactMarshaler: true, CopyString : true, ValidateString : true, }.Froze() // ConfigFastest is the fastest config of APIs, aiming at speed. // ConfigFastest是api的最快配置,旨在提高速度。 ConfigFastest = Config{ NoQuoteTextMarshaler: true, }.Froze() ) sonic提供了三种常用的Config配置。这些配置中对一些场景已经预定义好了对应的Config。 其实我们使用的sonic.Marshal()函数就是调用了默认的ConfigDefault // Marshal returns the JSON encoding bytes of v. func Marshal(val interface{}) ([]byte, error) { return ConfigDefault.Marshal(val) } // Unmarshal parses the JSON-encoded data and stores the result in the value pointed to by v. // NOTICE: This API copies given buffer by default, // if you want to pass JSON more efficiently, use UnmarshalString instead. func Unmarshal(buf []byte, val interface{}) error { return ConfigDefault.Unmarshal(buf, val) } 但是在一些场景下我们不满足于sonic预定义的三个Config。此时我们可以定义自己的Config进行个性化的编码和解码。 首先先看一下Config的结构。 // Config is a combination of sonic/encoder.Options and sonic/decoder.Options type Config struct { // EscapeHTML indicates encoder to escape all HTML characters // after serializing into JSON (see https://pkg.go.dev/encoding/json#HTMLEscape). // WARNING: This hurts performance A LOT, USE WITH CARE. EscapeHTML bool // SortMapKeys indicates encoder that the keys of a map needs to be sorted // before serializing into JSON. // WARNING: This hurts performance A LOT, USE WITH CARE. SortMapKeys bool // CompactMarshaler indicates encoder that the output JSON from json.Marshaler // is always compact and needs no validation CompactMarshaler bool // NoQuoteTextMarshaler indicates encoder that the output text from encoding.TextMarshaler // is always escaped string and needs no quoting NoQuoteTextMarshaler bool // NoNullSliceOrMap indicates encoder that all empty Array or Object are encoded as '[]' or '{}', // instead of 'null' NoNullSliceOrMap bool // UseInt64 indicates decoder to unmarshal an integer into an interface{} as an // int64 instead of as a float64. UseInt64 bool // UseNumber indicates decoder to unmarshal a number into an interface{} as a // json.Number instead of as a float64. UseNumber bool // UseUnicodeErrors indicates decoder to return an error when encounter invalid // UTF-8 escape sequences. UseUnicodeErrors bool // DisallowUnknownFields indicates decoder to return an error when the destination // is a struct and the input contains object keys which do not match any // non-ignored, exported fields in the destination. DisallowUnknownFields bool // CopyString indicates decoder to decode string values by copying instead of referring. CopyString bool // ValidateString indicates decoder and encoder to valid string values: decoder will return errors // when unescaped control chars(\u0000-\u001f) in the string value of JSON. ValidateString bool } 由于字段较多。笔者就选择几个字段进行演示,其他字段使用方式都是一致。 假设我们希望对JSON序列化按照key进行排序以及将JSON编码成紧凑的格式。我们可以配置Config进行Marshal操作 func base() { snc := sonic.Config{ CompactMarshaler: true, SortMapKeys: true, }.Froze() snc.Marshal(obj) } 考虑到排序带来的性能损失(约 10% ), sonic 默认不会启用这个功能。 Sonic 默认将基本类型( struct , map 等)编码为紧凑格式的 JSON ,除非使用 json.RawMessage or json.Marshaler 进行编码: sonic 确保输出的 JSON 合法,但出于性能考虑,不会加工成紧凑格式。我们提供选项 encoder.CompactMarshaler 来添加此过程, Ast.Node sonic提供了Ast.Node的功能。Sonic/ast.Node 是完全独立的 JSON 抽象语法树库。它实现了序列化和反序列化,并提供了获取和修改通用数据的鲁棒的 API。 先来简单介绍一下Ast.Node:ast.Node 通常指的是编程语言中的抽象语法树(Abstract Syntax Tree)节点。抽象语法树是编程语言代码在编译器中的内部表示,它以树状结构展现代码的语法结构,便于编译器进行语法分析、语义分析、优化等操作。 在很多编程语言的编译器或解释器实现中,抽象语法树中的每个元素(节点)都会有对应的数据结构表示,通常这些数据结构会被称为 ast.Node 或类似的名字。每个 ast.Node 表示源代码中的一个语法结构,如表达式、语句、函数声明等。 抽象语法树的节点可以包含以下信息: 节点的类型:例如表达式、语句、函数调用等。 节点的内容:节点所代表的源代码的内容。 子节点:一些节点可能包含子节点,这些子节点也是抽象语法树的节点,用于构建更复杂的语法结构。 属性:一些节点可能会包含附加的属性,如变量名、操作符类型等。 我们通过几个案例理解一下Ast.Node的使用。 准备数据 data := `{"name": "z3","info":{"num": [11,22,33]}}` 将数据转换为Ast.Node 通过传入bytes或者string返回一个Ast.Node。其中你可以指定path获取JSON中的子路径元素。 每个路径参数必须是整数或者字符串 整数是目标索引(>=0),表示以数组形式搜索当前节点。 字符串为目标key,表示搜索当前节点为对象。 // 函数签名: func Get(src []byte, path ...interface{}) (ast.Node, error) { return GetFromString(string(src), path...) } // GetFromString与Get相同,只是src是字符串,这样可以减少不必要的内存拷贝。 func GetFromString(src string, path ...interface{}) (ast.Node, error) { return ast.NewSearcher(src).GetByPath(path...) } 获取当前节点的完整数据 func base() { data := `{"name": "z3","info":{"num": [11,22,33]}}` // no path return all json string root, err := sonic.GetFromString(data) if err != nil { log.Panic(err) } if raw, err := root.Raw(); err != nil { log.Panic(err) } else { log.Println(raw) } } // print // 2023/08/26 17:15:52 {"name": "z3","info":{"num": [11,22,33]}} 根据path或者索引获取数据 func base() { data := `{"name": "z3","info":{"num": [11,22,33]}}` // no path return all json string root, err := sonic.GetFromString(data) if err != nil { log.Panic(err) } // according to path(根据key,查询当前node下的元素) if path, err := root.GetByPath("name").Raw(); err != nil { log.Panic(err) } else { log.Println(path) } // indexOrget (同时提供index和key进行索引和key的匹配) if path, err := root.IndexOrGet(1, "info").Raw(); err != nil { log.Panic(err) } else { log.Println(path) } // index (按照index进行查找当前node下的元素) // root.Index(1).Index(0).Raw()意味着 // root.Index(1) == "info" // root.Index(1).Index(0) == "num" // root.Index(1).Index(0).Raw() == "[11,22,33]" if path, err := root.Index(1).Index(0).Raw(); err != nil { log.Panic(err) } else { log.Println(path) } } // print // 2023/08/26 17:17:49 "z3" // 2023/08/26 17:17:49 {"num": [11,22,33]} // 2023/08/26 17:17:49 [11,22,33] Ast.Node支持链式调用。故我们可以从root node节点,根据path路径向下搜索指定的元素。 index和key混用 user := root.GetByPath("statuses", 3, "user") // === root.Get("status").Index(3).Get("user") 根据path进行修改数据 func base() { data := `{"name": "z3","info":{"num": [11,22,33]}}` // no path return all json string root, err := sonic.GetFromString(data) if err != nil { log.Panic(err) } // according to path if path, err := root.GetByPath("name").Raw(); err != nil { log.Panic(err) } else { log.Println(path) } // indexOrget (同时提供index和key进行索引和key的匹配) if path, err := root.IndexOrGet(1, "info").Raw(); err != nil { log.Panic(err) } else { log.Println(path) } // index if path, err := root.Index(1).Index(0).Raw(); err != nil { log.Panic(err) } else { log.Println(path) } // set // ast提供了很多go类型转换node的函数 if _, err := root.Index(1).SetByIndex(0, ast.NewArray([]ast.Node{ ast.NewNumber("101"), ast.NewNumber("202"), })); err != nil { log.Panic(err) } raw, _ := root.Raw() log.Println(raw) } // print // 2023/08/26 17:23:55 "z3" // 2023/08/26 17:23:55 {"num": [11,22,33]} // 2023/08/26 17:23:55 [11,22,33] // 2023/08/26 17:23:55 {"name":"z3","info":{"num":[101,202]}} 序列化 func base() { data := `{"name": "z3","info":{"num": [11,22,33]}}` // no path return all json string root, err := sonic.GetFromString(data) if err != nil { log.Panic(err) } bts, _ := root.MarshalJSON() log.Println("Ast.Node(Marshal): ", string(bts)) btes, _ := json.Marshal(&root) log.Println("encoding/json (Marshal): ", string(btes)) } // print // 2023/08/26 17:39:06 Ast.Node(Marshal): {"name": "z3","info":{"num": [11,22,33]}} // 2023/08/26 17:39:06 encoding/json (Marshal): {"name":"z3","info":{"num":[11,22,33]}} ⚠: 使用json.Marshal() (必须传递指向节点的指针) API Ast.Node提供了许多有特色的API,感兴趣的朋友可以去试一下。 合法性检查: Check(), Error(), Valid(), Exist() 索引: Index(), Get(), IndexPair(), IndexOrGet(), GetByPath() 转换至 go 内置类型: Int64(), Float64(), String(), Number(), Bool(), Map[UseNumber|UseNode](), Array[UseNumber|UseNode](), Interface[UseNumber|UseNode]() go 类型打包: NewRaw(), NewNumber(), NewNull(), NewBool(), NewString(), NewObject(), NewArray() 迭代: Values(), Properties(), ForEach(), SortKeys() 修改: Set(), SetByIndex(), Add() 最佳实践 预热 由于 Sonic 使用 golang-asm 作为 JIT 汇编器,这个库并不适用于运行时编译,第一次运行一个大型模式可能会导致请求超时甚至进程内存溢出。为了更好地稳定性,我们建议在运行大型模式或在内存有限的应用中,在使用 Marshal()/Unmarshal() 前运行 Pretouch()。 拷贝字符串 当解码 没有转义字符的字符串时, sonic 会从原始的 JSON 缓冲区内引用而不是复制到新的一个缓冲区中。这对 CPU 的性能方面很有帮助,但是可能因此在解码后对象仍在使用的时候将整个 JSON 缓冲区保留在内存中。实践中我们发现,通过引用 JSON 缓冲区引入的额外内存通常是解码后对象的 20% 至 80% ,一旦应用长期保留这些对象(如缓存以备重用),服务器所使用的内存可能会增加。我们提供了选项 decoder.CopyString() 供用户选择,不引用 JSON 缓冲区。这可能在一定程度上降低 CPU 性能 func base() { // 在sonic.Config中进行配置 snc := sonic.Config{ CopyString: true, }.Froze() } 传递字符串还是字节数组 为了和 encoding/json 保持一致,我们提供了传递 []byte 作为参数的 API ,但考虑到安全性,字符串到字节的复制是同时进行的,这在原始 JSON 非常大时可能会导致性能损失。因此,你可以使用 UnmarshalString() 和 GetFromString() 来传递字符串,只要你的原始数据是字符串,或零拷贝类型转换对于你的字节数组是安全的。我们也提供了 MarshalString() 的 API ,以便对编码的 JSON 字节数组进行零拷贝类型转换,因为 sonic 输出的字节始终是重复并且唯一的,所以这样是安全的。 零拷贝类型转换是一种技术,它允许你在不进行实际数据复制的情况下,将一种数据类型转换为另一种数据类型。这种转换通过操作原始内存块的指针和切片来实现,避免了额外的数据复制,从而提高性能并减少内存开销. 需要注意的是,零拷贝类型转换虽然可以提高性能,但也可能引入一些安全和可维护性的问题,特别是当直接操作指针或内存映射时。 性能优化 在 完全解析的场景下, Unmarshal() 表现得比 Get()+Node.Interface() 更好。 func base() { data := `{"name": "z3","info":{"num": [11,22,33]}}` // complete parsing m := map[string]interface{}{} sonic.Unmarshal([]byte(data), &m) } 但是如果你只有特定 JSON的部分模式,你可以将 Get() 和 Unmarshal() 结合使用: func base() { data := `{"name": "z3","info":{"num": [11,22,33]}}` // complete parsing m := map[string]interface{}{} sonic.Unmarshal([]byte(data), &m) // partial parsing clear(m) node, err := sonic.GetFromString(data, "info", "num", 1) if err != nil { panic(err) } log.Println(node.Raw()) } 参考 github.com/sonic